Creating Output Destinations
Before you can deploy your output, you must create output destinations. You can specify one output destination or multiple output destinations. Specify multiple output destinations when you want to deploy your output to multiple locations. For example, assume that you place your generated output to a web server computer, and you use both a staging server and a production server. You can create one output destination in ePublisher for the staging server, and another output destination in ePublisher for the production server.
Output destinations are not project or target specific. When you define output destinations in ePublisher, ePublisher saves the output destinations you define and allows you to use the output destinations you specify across multiple ePublisher projects and targets.
Because output destinations do not belong to any one project, you can create and edit them at any time. On the Edit menu, click Deploy Destinations..., or click the Deploy Destinations button on the toolbar. You do not need to have a project open or a target selected. The output destinations you define are local to your Windows user on this computer, and used by ePublisher Designer, ePublisher Express, and ePublisher AutoMap.
You can also open the same window from the settings of a specific target, by clicking Deploy Destinations... in the Target Settings window. Opened from the Edit menu or the toolbar, Add offers the Folder and Amazon S3 deployment types. Opened from a target's settings, Add also offers any additional deployment types supported by the output format of that target.
When you deploy output to an output destination, ensure you specify a descriptive name for the output destination. When you work with output destination, you can only see the name of the output destination. You will not be able to see the actual path you specified to the output destination. Type a descriptive name for the output destination that allows you to easily identify each output destination you specify.
For example, if you are deploying WebWorks Help output for a product to both a staging server and a production server, type Production Server ProductA WebWorks Help for the first output destination. When you create your second output destination, type Staging Server ProductA WebWorks Help for the second output destination.
To create an output destination
Open the Deploy Destinations window by completing one of the following steps:
On the Edit menu, click Deploy Destinations..., or click the Deploy Destinations button on the toolbar. You do not need to have a project open or a target selected.
On the Target menu, click Target Settings, and then click Deploy Destinations....
Complete the following steps:
Click Add > Folder.
In the Name field, type a descriptive name for the output destination.
In the Directory field, type the path to the folder you want to specify as the output destination, or click the folder icon and then browse to and select the folder where you would like to deploy your output.
Click OK.
After you create an output destination, you must specify which target is associated with the output destination before you can deploy output. For more information, see Specifying Output Destinations for Targets and Deploying Output to Output Destinations.
ePublisher can also deploy directly to Amazon S3, optionally fronted by CloudFront. Uploads apply web-appropriate caching — versioned assets are cached immutably while pages and maps are always revalidated — and changed pages trigger a CloudFront invalidation when a distribution is configured.
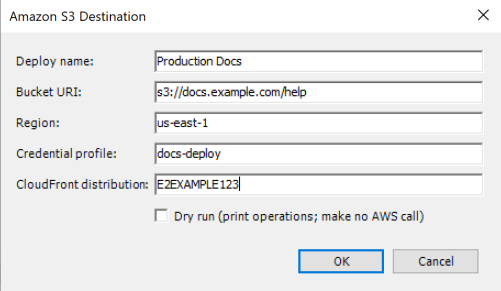
To create an Amazon S3 output destination
Open the Deploy Destinations window by completing one of the following steps:
On the Edit menu, click Deploy Destinations..., or click the Deploy Destinations button on the toolbar. You do not need to have a project open or a target selected.
On the Target menu, click Target Settings, and then click Deploy Destinations....
Complete the following steps:
Click Add > Amazon S3.
In the Deploy name field, type a descriptive name for the output destination.
In the Bucket URI field, type the destination in the form
s3://bucketors3://bucket/prefix.In the Region field, type the bucket's AWS region, for example
us-east-1.(Optional) In the Credential profile field, type the named AWS credential profile to use. When empty, the standard AWS credential chain applies (environment, default profile, or instance role). ePublisher never stores AWS access keys.
(Optional) In the CloudFront distribution field, type the ID of the distribution that fronts the bucket, so deployments invalidate changed pages.
(Optional) Check Dry run (print operations; make no AWS call) to have deployments print every intended operation without contacting AWS. Use this to verify a new destination safely.
Click OK.